

I made my Octagon Flowers by sewing 3 strips together - all 2.5" inches. I use the entire length of the fabric and throw the left-overs in the scrap pile, but I think it will take about 26" of fabric per strip. Also, you can get 3 2.5" strips out of a 1/4 yard cut of fabric.
OK - so once sewn together I press the seams all in one direction - this way the seams will "butt" up against each other as you sew the segments together.
The ruler I used was a 45 degree kaleidoscope ruler by Nifty Notions - Cut for the Cure line (I think I bought it online from The Quilt Bus) by Kaye England.
When you sew the segments together it is important to keep track of the sequence or else your pieces might not alternate the way you want them to (ask me how I know). So, I find it helpful to lay the circle out near my machine and sew the segments together in order. Press. Sew the segments into 1/2 circles. Press. Sew the 1/2 circle units into circles. Press. If it cups up a little - spray with spray starch and press again - spray starch works like magic on circle pieces! I usually do a few circles at a time.
My setting triangles are 4.25" squares cut in 1/2 on the diagonal. This is what worked for me with the 2.5" strips. If you start with a different sized strip - adjust accordingly! Now, the funny thing is that I couldn't figure out the mathmatical formula for these pieces so I sent an e-mail to Kaye England for directions. Wonderful quick response - "fold a square in 1/2 until you have a piece larger than that corner then cut your squares to that size - cut in 1/2 - attach and square to fit the remaining. This corner is not a math perfect unit and without having to own another ruler this is the simplest way." THANK YOU Kaye England Publications (www.KayeEngland.com) for such a speedy response!
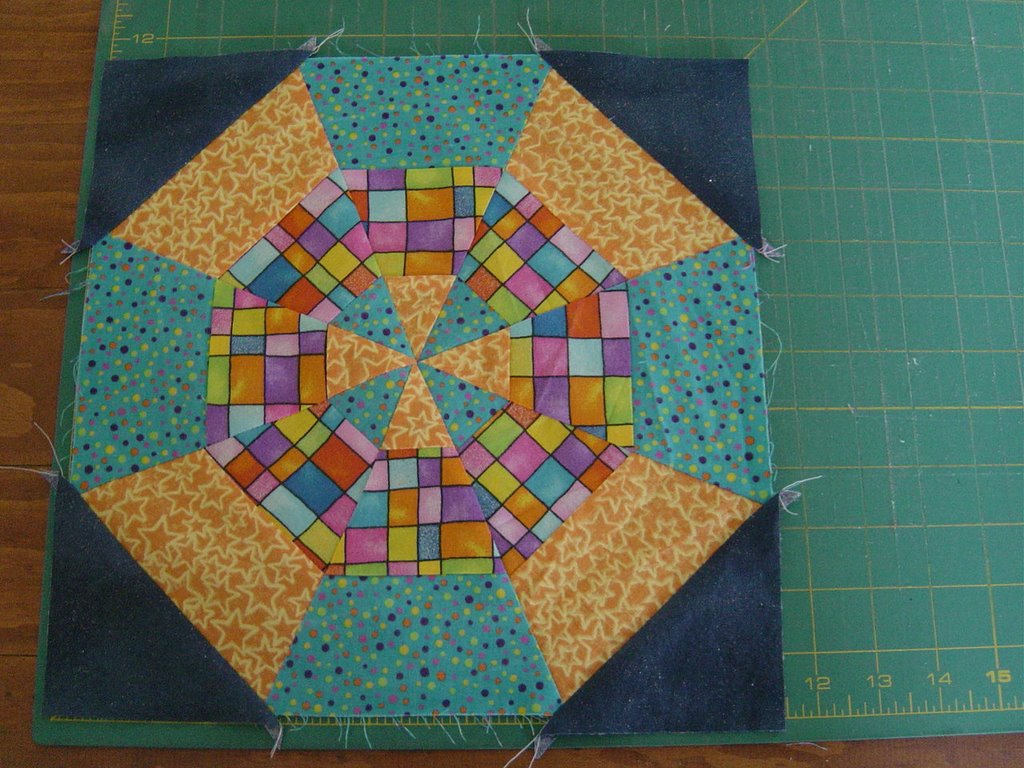
And here is a photo of the finished flower - mine measures 11.5". If you use contrasting fabric for the 2 outsides you will get a neat little pinwheel in the center. If you use similar fabrics on the 2 outsides you will get a series of circles - I like both ways so made some of each!
Anyway - it is a super fun way to use your Kaleidoscope ruler!
11 comments:
Thanks for the tutorial. (I am likeing the scrappiness of your project.)
I'm going to try this--I think my Burns Kaleidoscope ruler might work or another 60 degree angle that I have around here. Not today but with some scraps, I have hopes of getting some binding done.
Ahhh! I"m going to scrap camp in a week and a half! This may be a great stash buster project!
Very colorful and pretty! What a neat idea. I have one of those rulers but have yet to use it. I've had it for years!
I think I get it... may need to get me one of those rulers :-)
I absolutely love that! Now I need to get one of those rulers! :)
These are great Ev! I love them!
Bonnie
What a great block. I may have to give it try. Thanks for the lesson.
Thank you for the instructions - I see a ruler purchase on the horizon.
I love these blocks more each time I see them- and you gave wonderful instructions - thanks Evelyn!
Great instructions! Thanks!
Post a Comment