Sunday, April 30, 2006

April Tally/May ideas


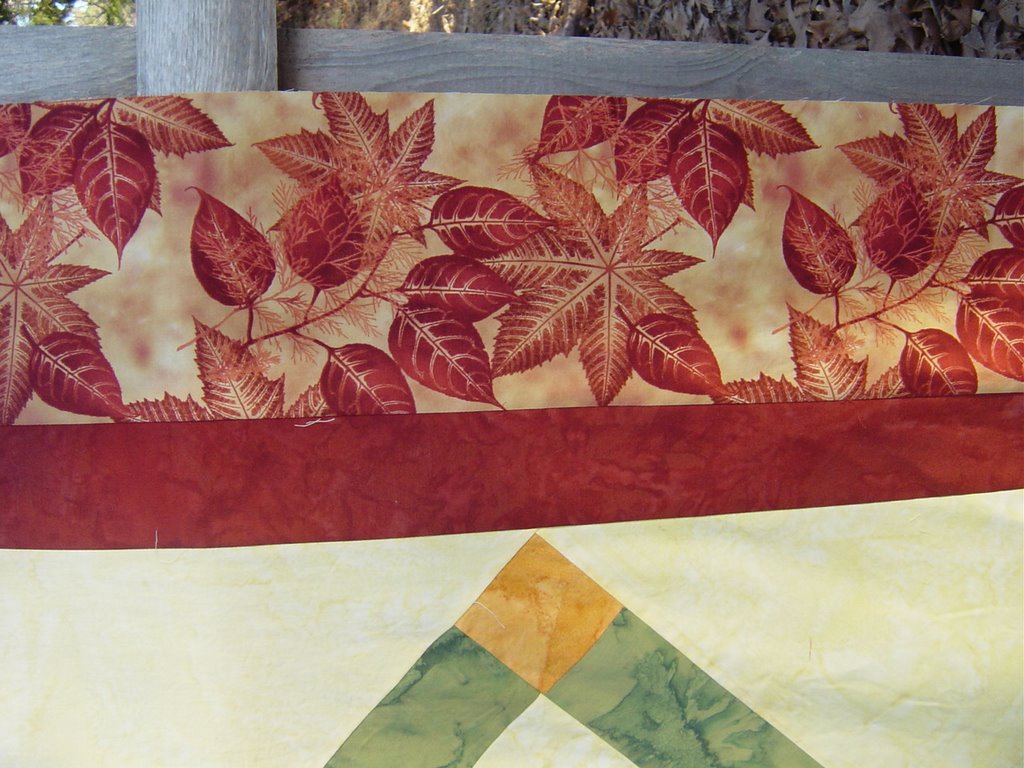
Here is a photo of my Broken Dishes quilt - with borders!

I like reading Jeanne's Month in Review posts, so have decided to start my own month end tally - sewing wise!

Let's see...

I went shopping and pretty much stuck to my list. Yeah!
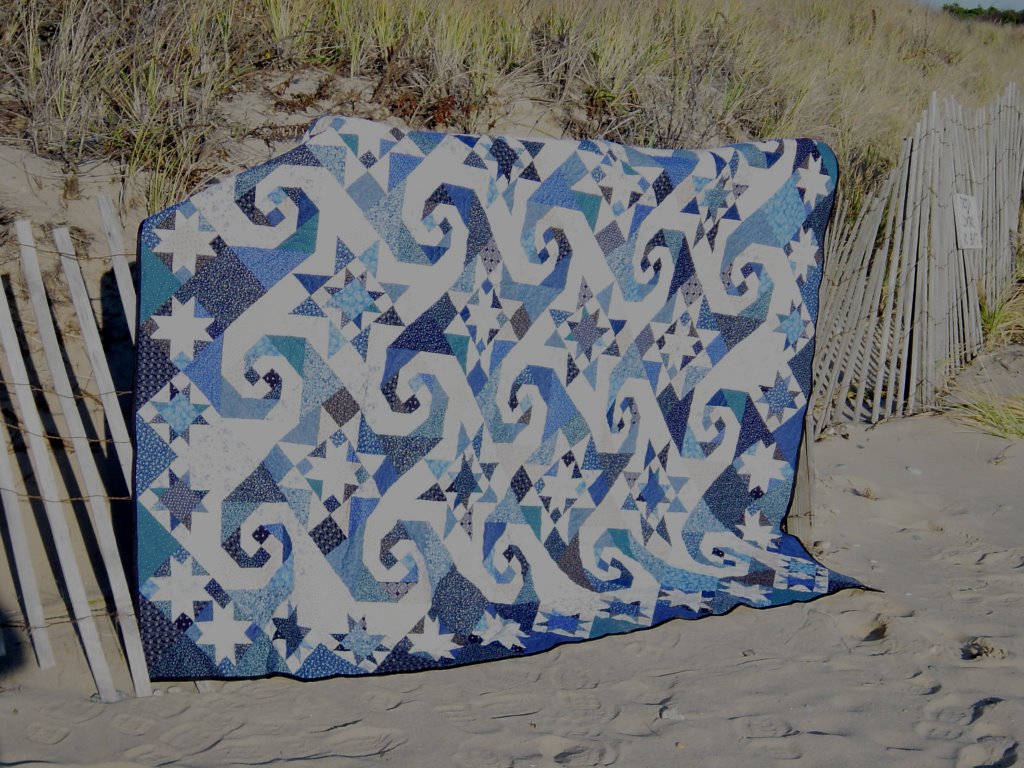
Bordered the whirly-gig 1 top - ready for long armer!
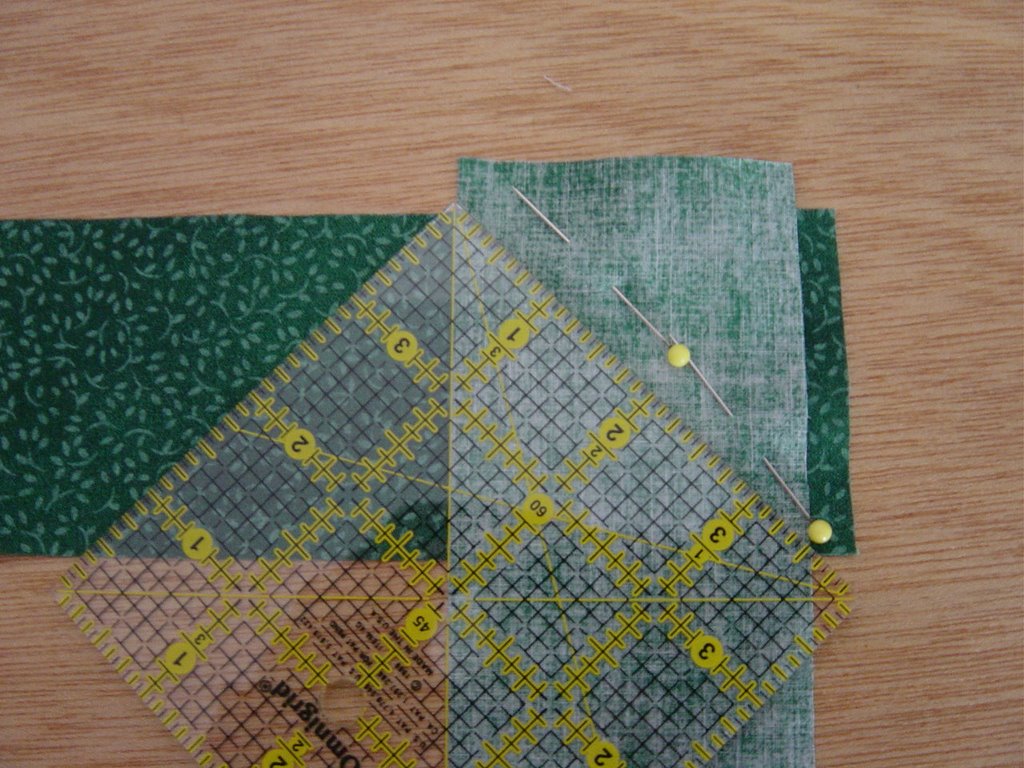
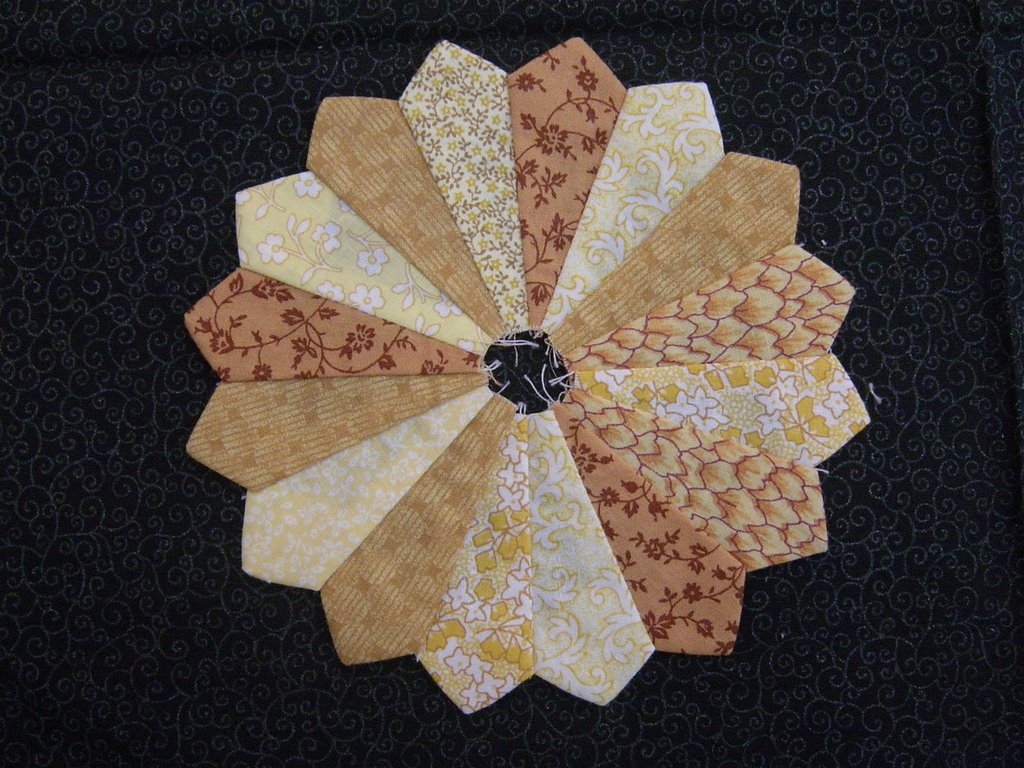
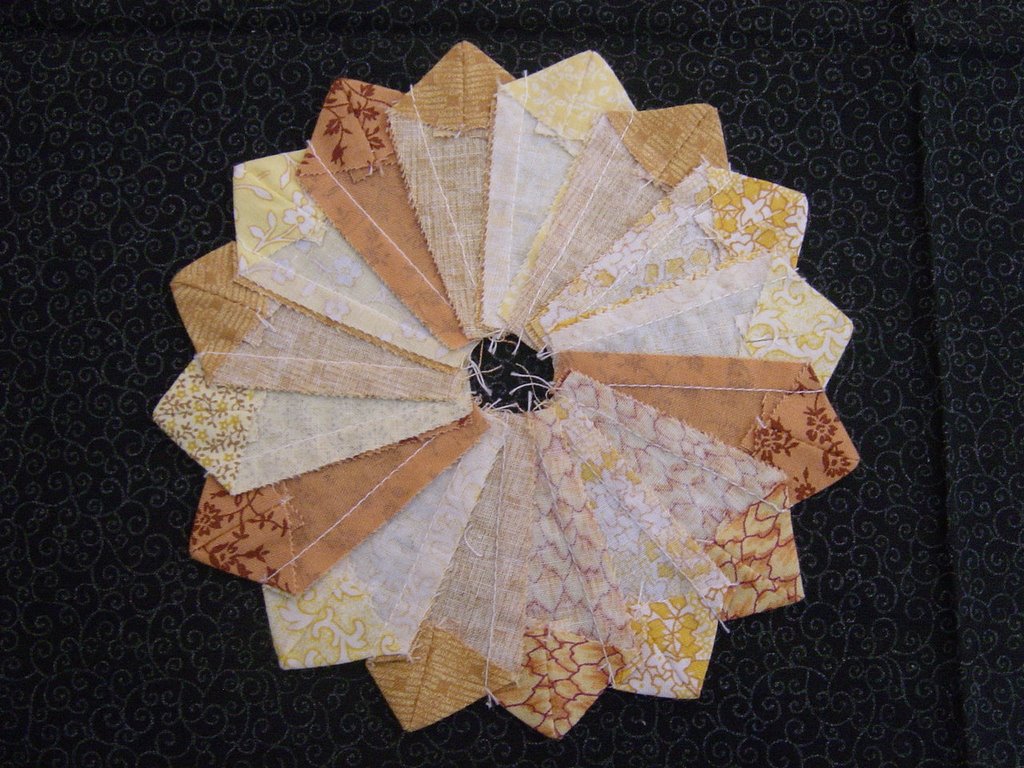
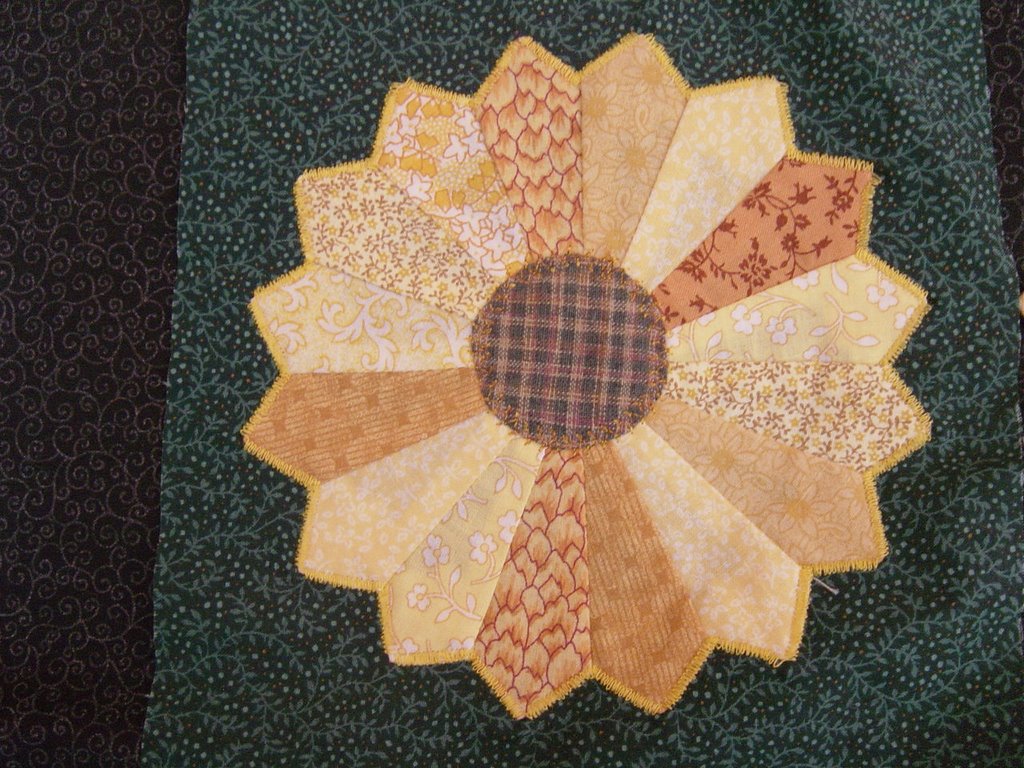
Made 1 flower block and learned a new technique
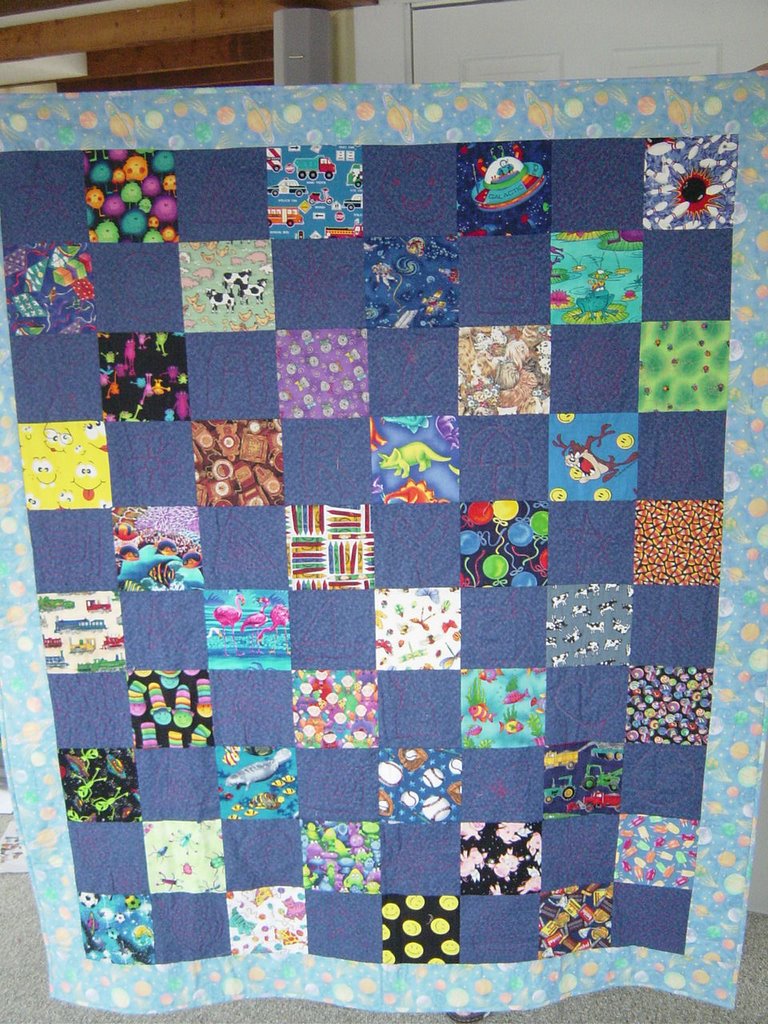
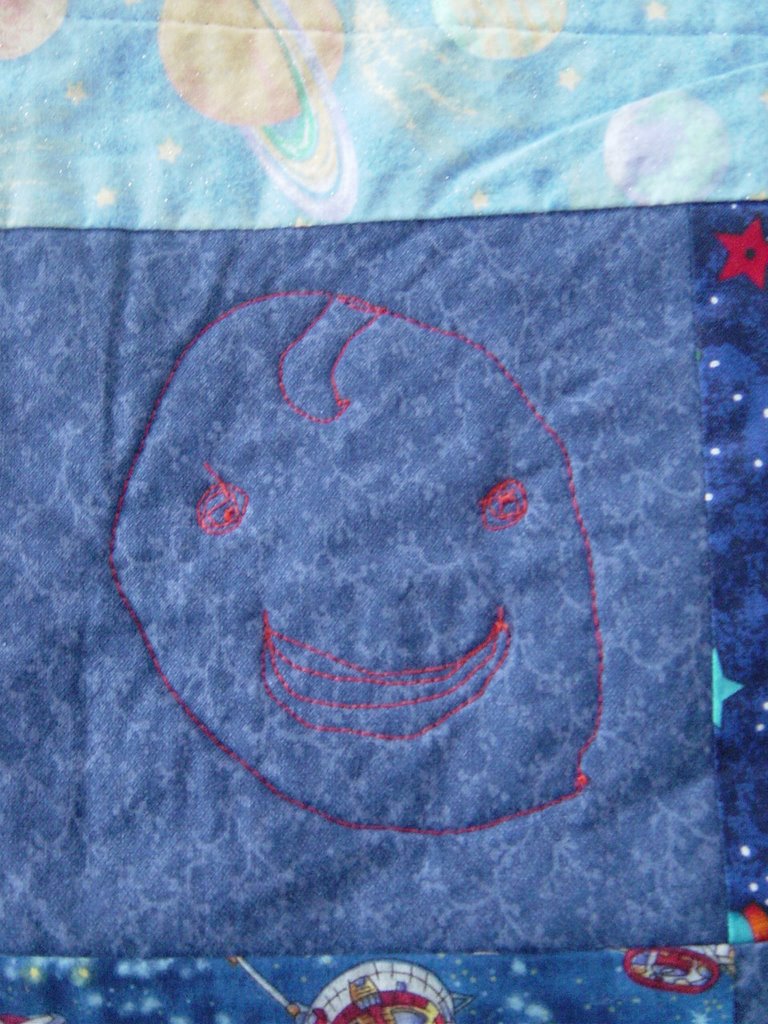
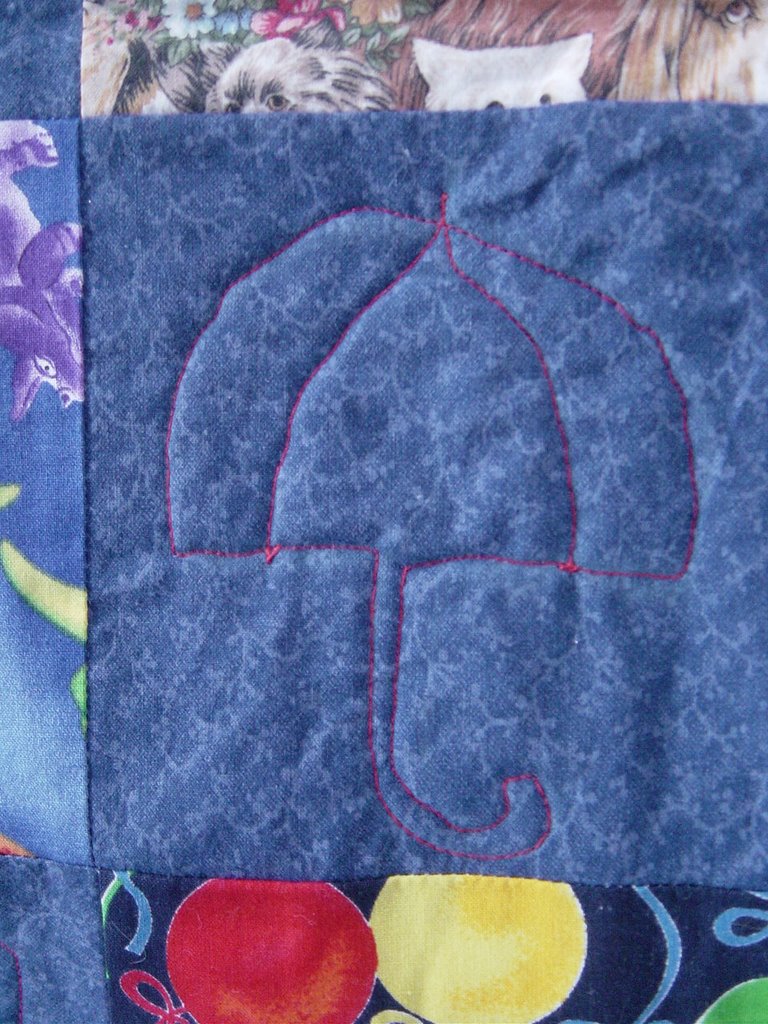
Put the binding on Little Boy's I Spy - a finish!
Bordered 2 baby quilt tops - still to be quilted by me
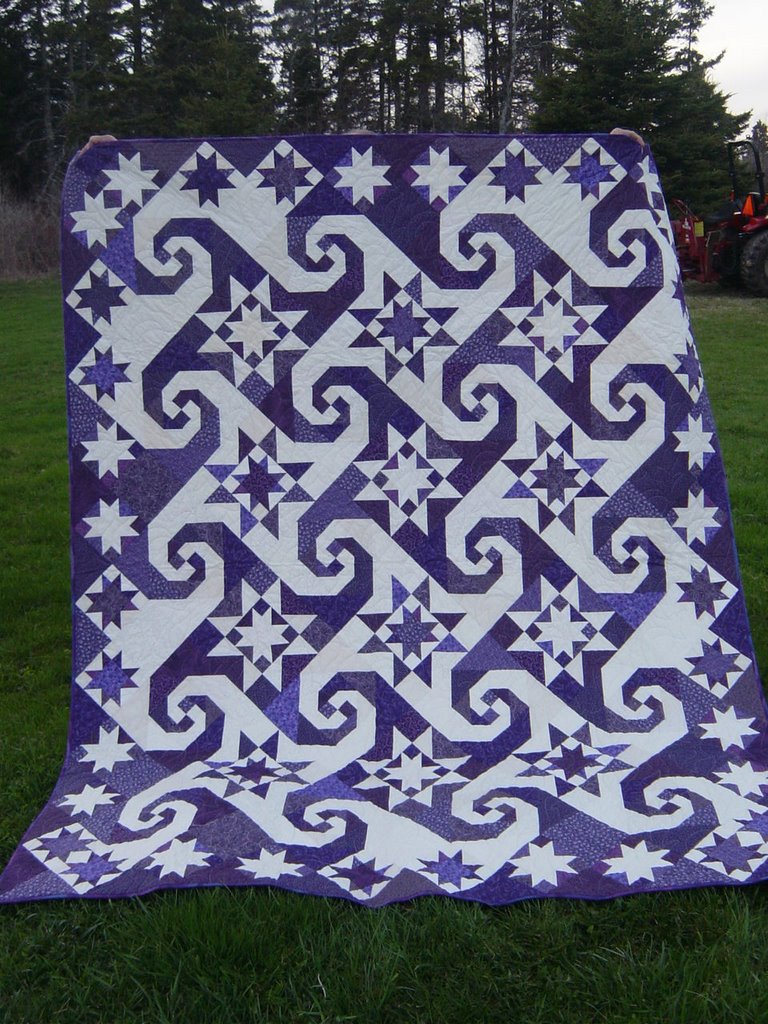
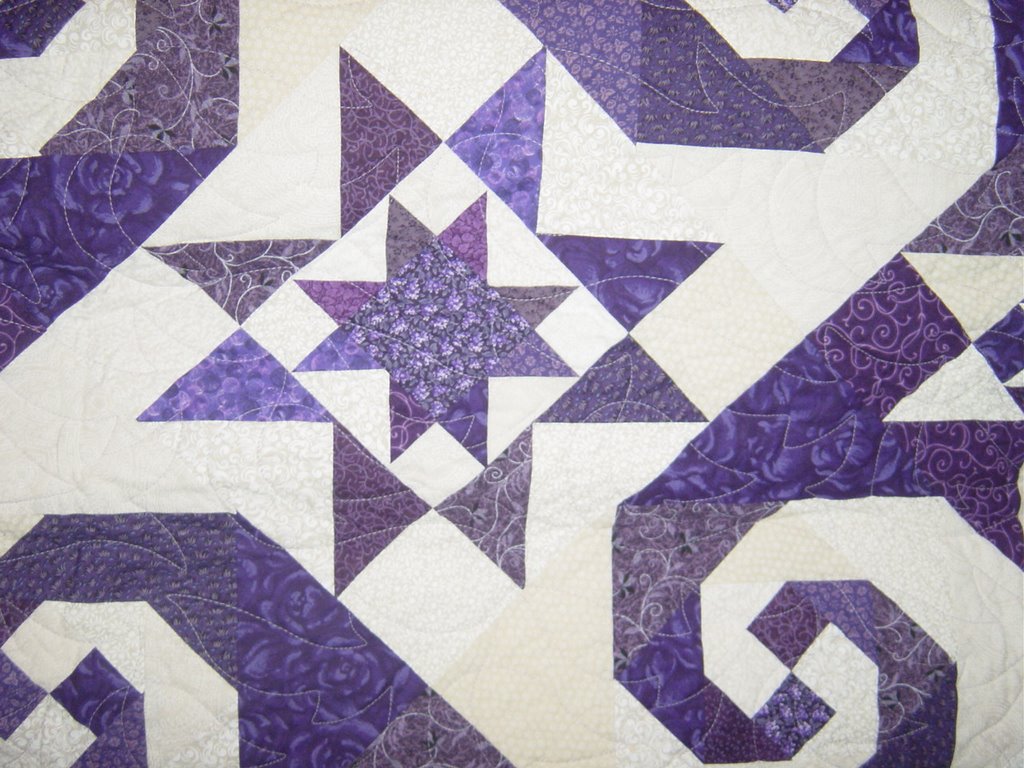
Bordered my Broken Dishes top - ready for long armer!
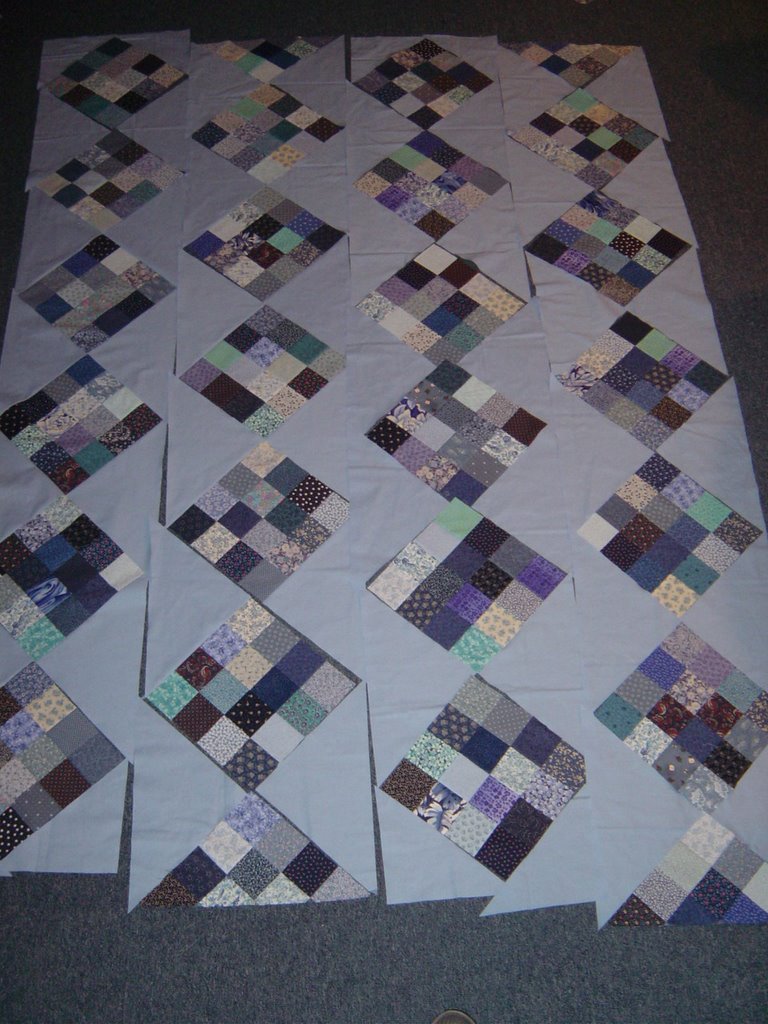
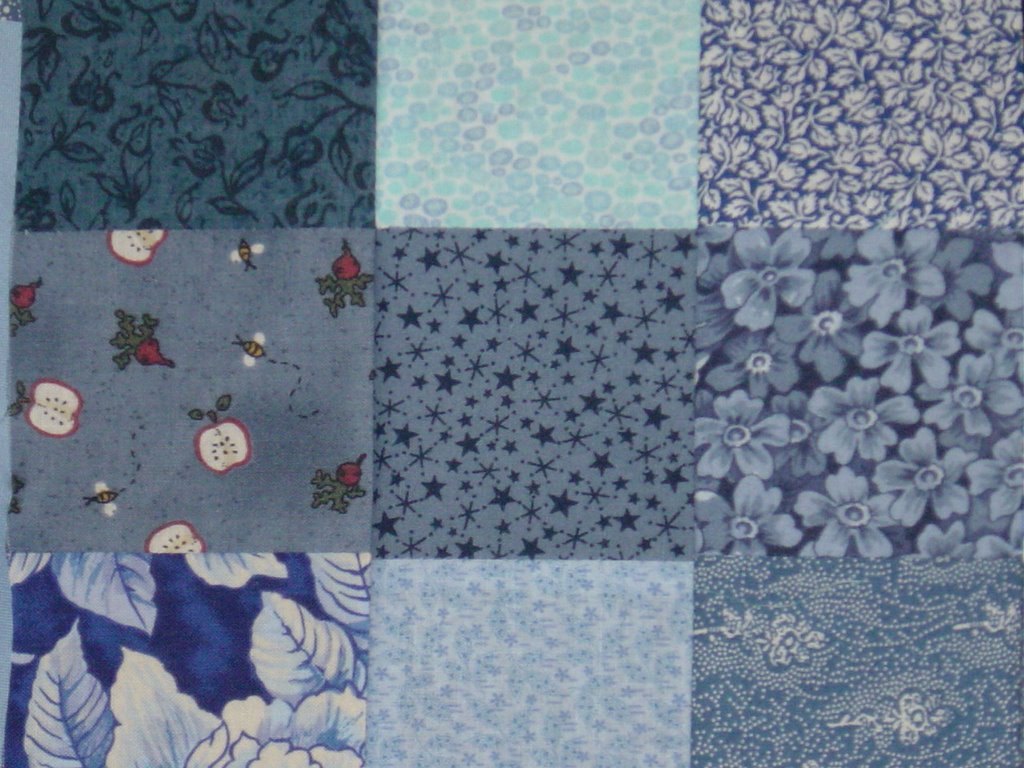
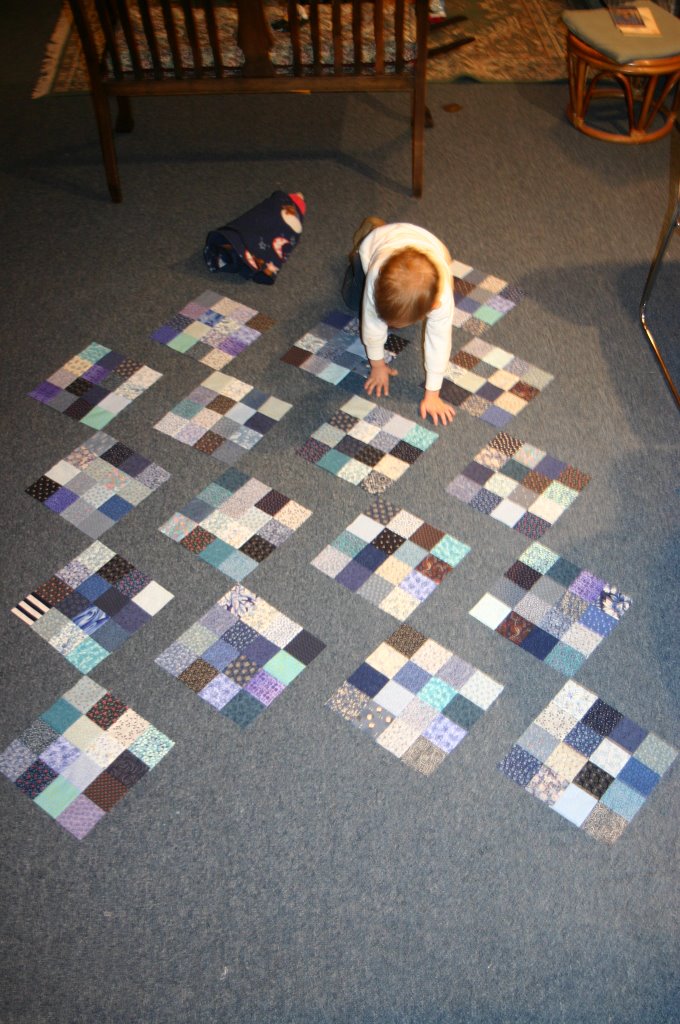
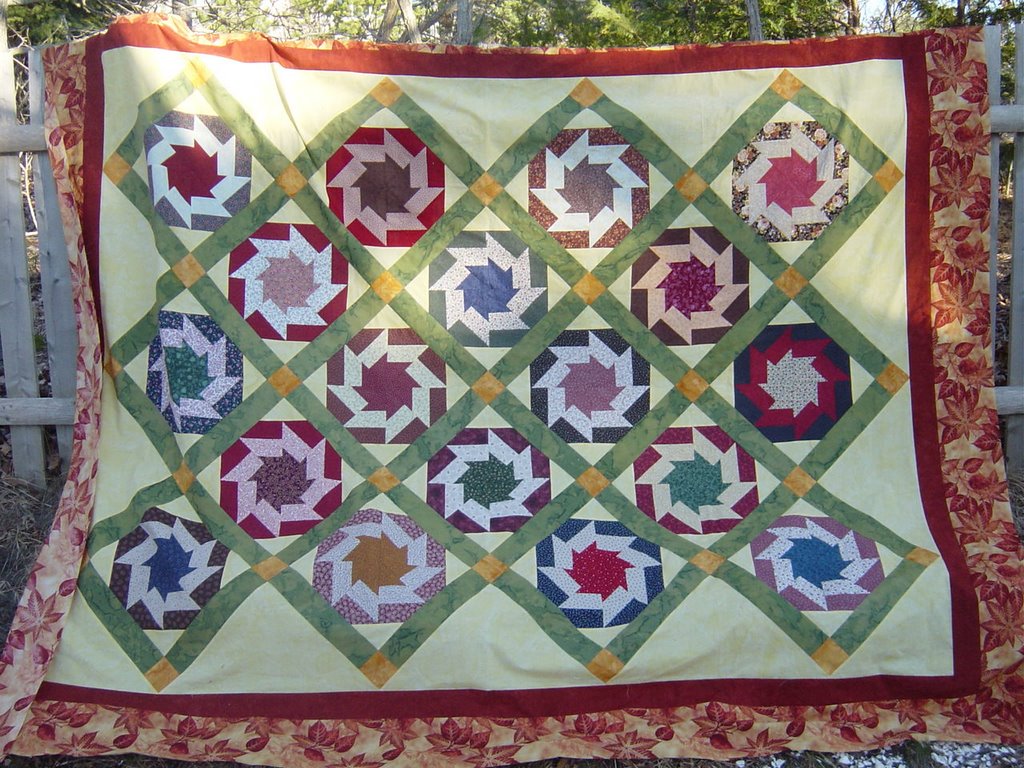
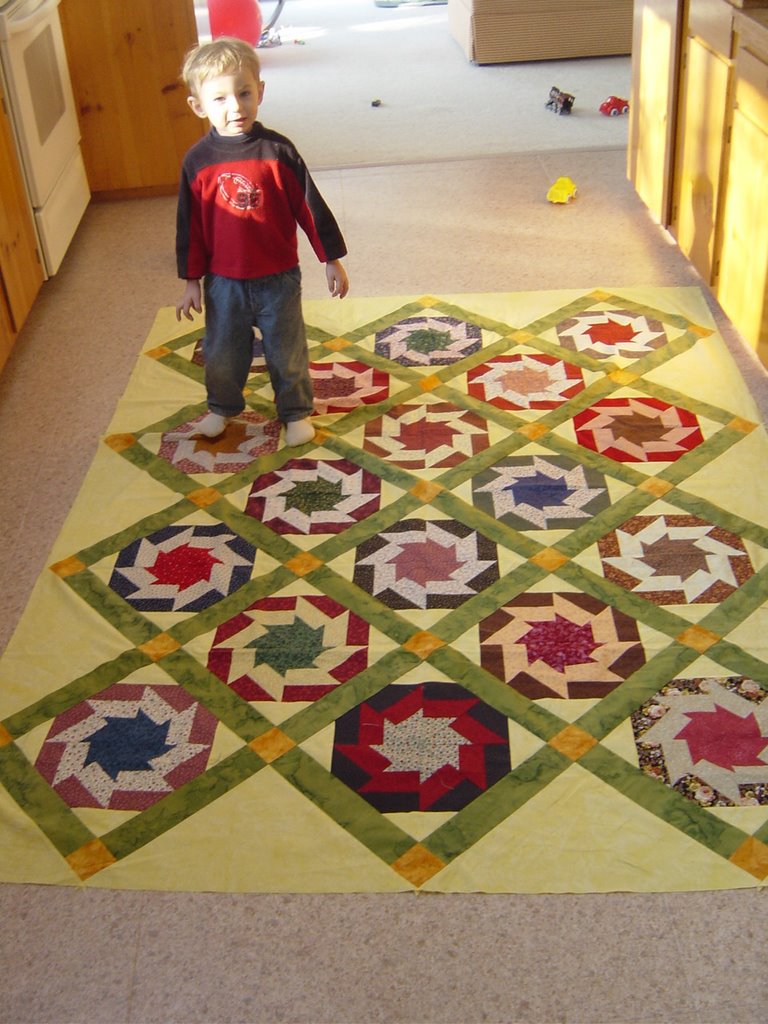
Got a good start on my scrappy blue squares - one of my Top 25 quilts
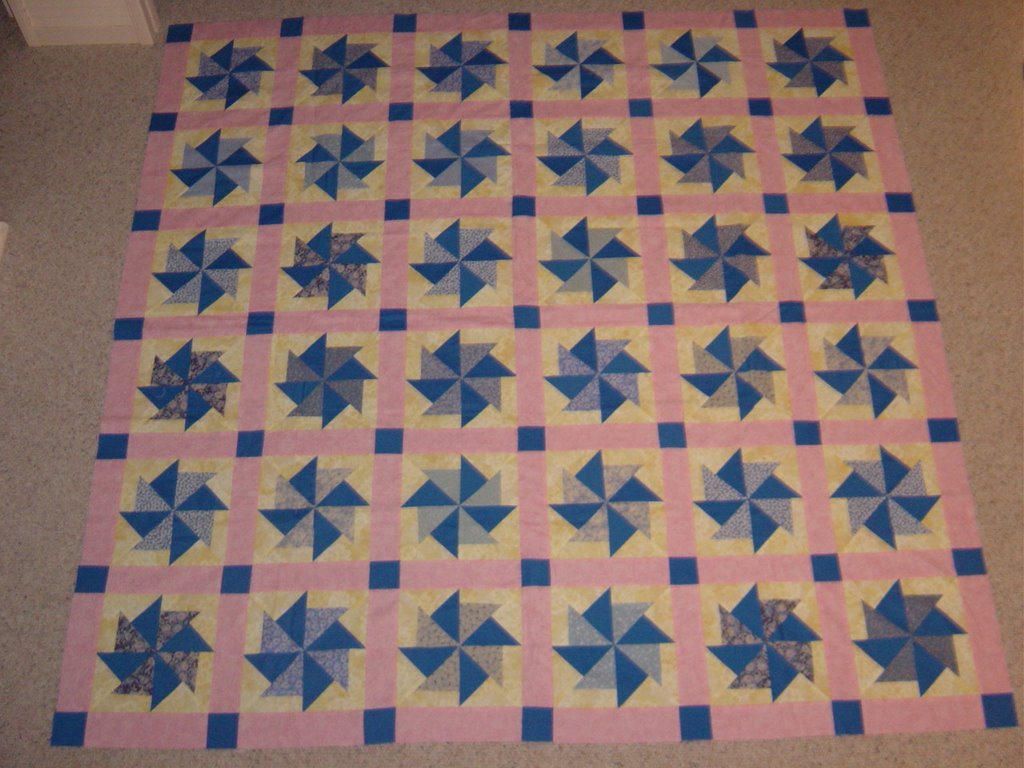
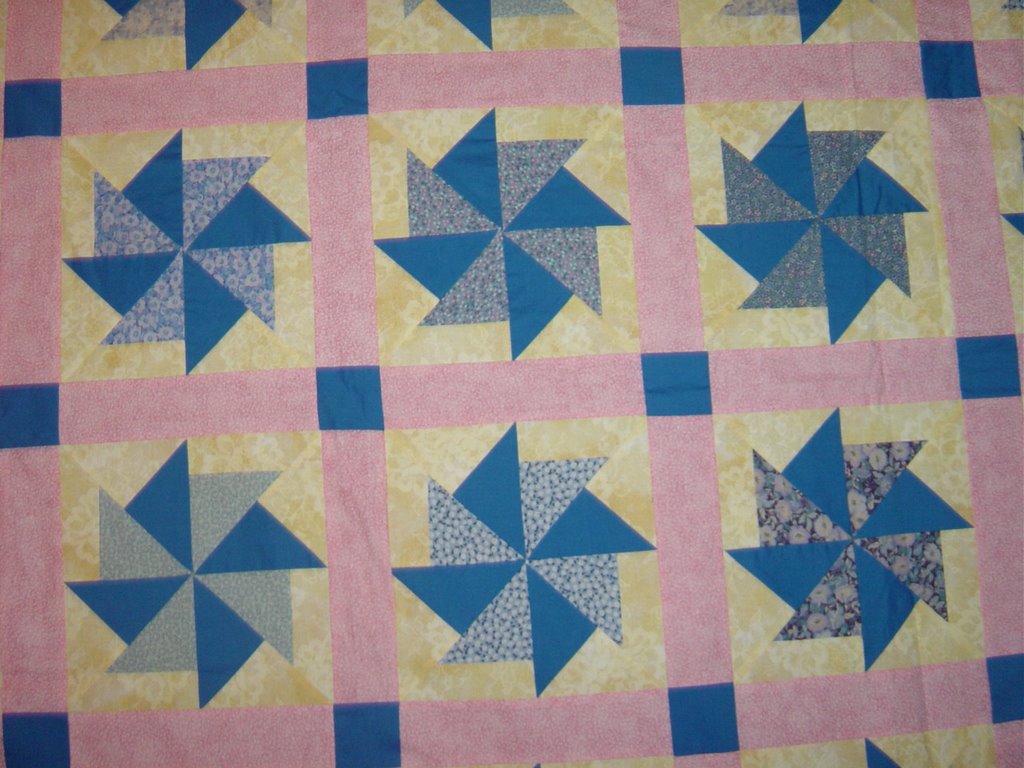
Decided the pink pinwheel quilt is done... does that count?
Looked at my Dresden Flower blocks - does that count?
Made my girlfriend a dress
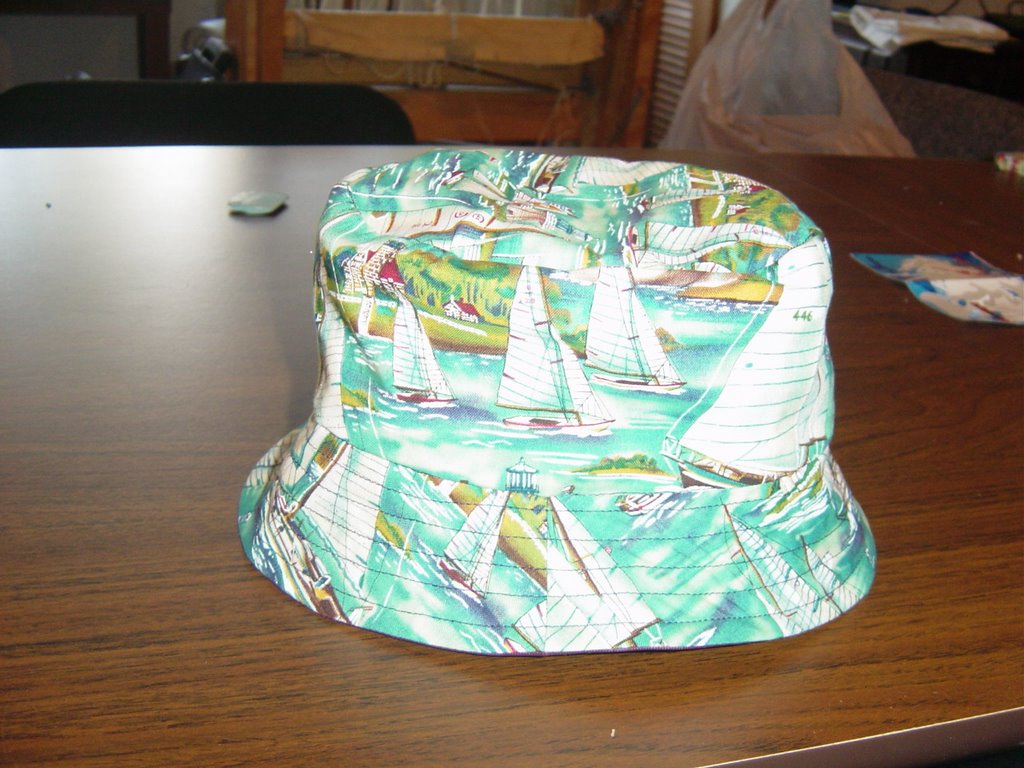
Made Little Boy a hat
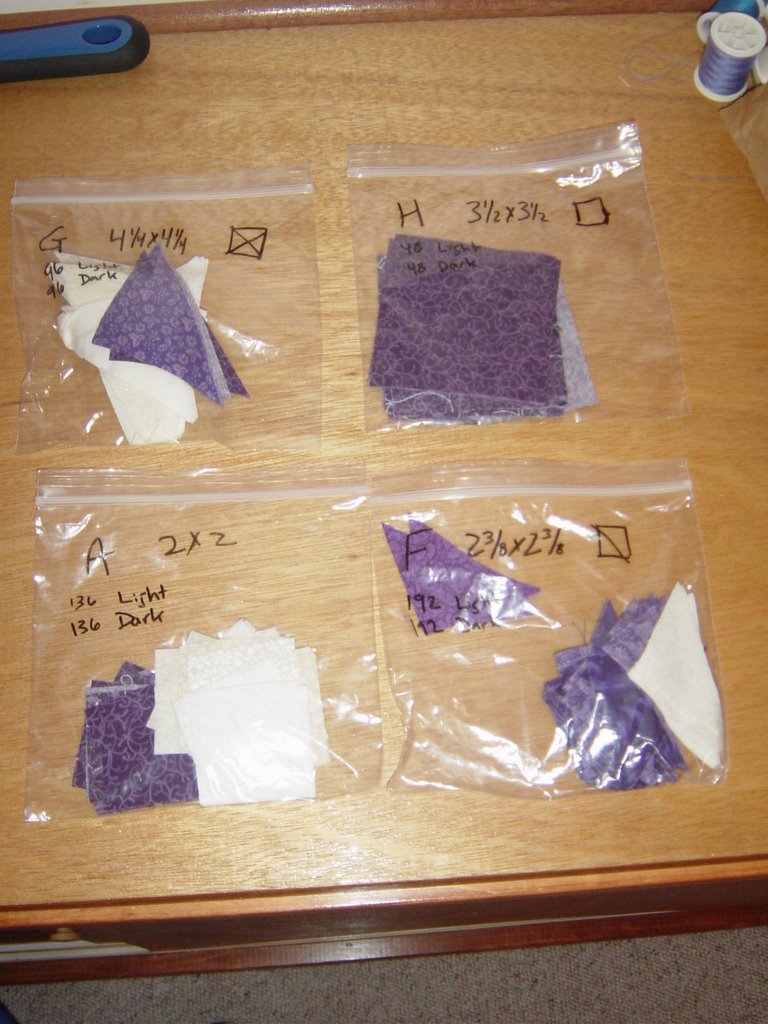
Re-organized my stash by color vs. lights/darks - will blog about this later!

AND, put the bindings on 2 more quilts for Little Boy. Yes, yes, I know - I still have to blog about my binding experience with that #%#*@ binding gizmo gadget (does that give you a clue - in other words, if I were you, I wouldn't run right out and buy one!).

Wow, that is alot! I am really pleased!!! And lookie there - I FINISHED more projects than I started. I get a gold star for the month!

And now I am wondering how I did all that because I was on the Cape and visiting like crazy, (oh, but I had a sewing machine there!), went to NH to see my sister, drove 2 days to Canada. My sister and her son came to visit us, which was wonderful (oh, but we sewed together!). AND, I had the most awful cold in the entire world for 2 weeks. Honestly, by the time it started to finally go away I was beginning to wonder if I had it in me to cough 1 more time even if my life depended upon it. Thankfully I am hardly ever sick and this cold was a good reminder to me of how happy I can be for that fact!

Of course, I did other things related to life in general; some of them pretty time consuming and others very mundane. And, of course, being a Momma to a very active Little Boy!

What lies ahead for May? Well that remains to be seen, but a lot less sewing will be going on because it is getting time to think about my gardening! I am the flower pot queen! I have been very jealous of all of you in the warmer climes this past month showing off your gardening treasures, but finally, it is starting to warm up around here so my turn is right around the corner! I am thinking of putting in a very small garden for Little Boy this year - maybe a pumpkin patch? - he is already a very good helper in the garden - loves to water the plants. Plus, I want to make some cushions for my outdoor teak bench. Oh, and I have the bright idea to make some sort of window treatments for various windows - so I will keep you posted about that. Add a party for about 100 people to the mix and then a smaller party for family and friends (the small party is on the Cape - so add another trip down there). Oh wait - did I just say - another trip to the USA? Add some shopping to the list! And - that is the reason I have been trying like crazy to get my tops ready for long arm quilting - I will be mailing them from the states so I don't have to worry about customs (mail), etc.

I have an idea that May will just fly by and before I know it - it will be June!


Saturday, April 29, 2006

Blue Progress!


I am thinking a skinny RED border and then a row of 3" blue squares set on the diagonal with the background fabric, then binding in RED. Like Jeanne, I think red goes with just about everything! And about the setting... Linda J. (over at http://catsnqlts2.blogspot.com/) has drafted a great diagram showing how to put blocks on the diagonal with a zig zaggy set. She did a great job - so go take a look! I knew that someone would ask me how I did it, so I took a few photos along the way...


Well, first you have to figure out how big to cut those setting triangles and corner triangles. You can find the formula over at Bonnie's site at www.quiltville.com - under Tips and Techniques - click on the on-point settings line. Voila! Just find the size of your finished block and go from there. I took this photo of what it was looking like in the early stages. I started with cutting 3" squares and my block is 10" finished, so I cut my setting squares 15.5" (slice 2X diagonallay) and corner squares 8" (slice 1X across the diagonal). This gives me a pretty big sized zig zag, but I still liked it enough to continue (but next time I am going to try it out on a much smaller block!). I am not sure I would do this setting on a block bigger than 10", but that is my personal perference.


And here is a photo as I am starting to lay the rows out - some seams are already sewn and some aren't which is why nothing lines up perfectly... yet! For those 1/2 squares on the ends of the rows, I made a complete block and sliced it almost in 1/2 - I off-set the center by 1/4" to allow for the seam allowance - so one side is 1/4" bigger - that is the side I used in the quilt top - the smaller half I tossed into my crumb scrap pile for another day. I am not positive that is the correct mathmatical formula to use, but I think it came out pretty good! Next time I think I will off-set it by 1/2" though to give me more leeway and then trim down to size after the rows are pieced together. It is those 1/2 squares where you use the corner setting triangles you cut.


And a close up of Little Boy's apple fabric! One more thing about fabric - I started with 4 yards of the background and I am wondering if I have enough for the pieced border. I originally wanted to make another row (3 full rows and 2 rows with the 1/2 squares on the end), but did not have enough fabric for the final row. So, right now the quilt is 4 rows with the possibility of a pieced border! It is still a good size so I am happy with it - and I now have 6 extra blocks all pieced and ready to go for another project.

About the binding experiement - well, by the time I got Little Boy to bed last night I was pretty tired, so didn't get too far on that project. Hopefully I will get somewhere with it tonight and will have something interesting to report about it all tomorrow! Then again, I might just curl up in bed with my laptop, we will see...

Friday, April 28, 2006

Easy Bindings?


I bought this little gadget from Keepsake Quilting (it is $30). I am hoping for an easy machine binding experience because I have a BIG quilt to bind and I am not looking forward to it! So, for an "experiment" project, I will bind a little quilt I made last summer for - you guessed it - Little Boy! I just can't help myself - I love making him quilts! I have my binding made and the foot attached to the machine - all ready to roll after Little Boy goes to bed. If everything goes well, then the big quilt will be next; I have my fingers crossed that I am going to love this little thing!


The directions are a bit sparse, but they do say to cut 2.5" strips for binding that will finish at 1/4". I usually cut my binding at 2 1/8", so this looks a bit big to me, but in anycase - I like to follow the directions at least the 1st time I try something new and then I can amend it to my own tastes the next time around, if needed. So, here are my strips. I like to do my bindings with a diagonal seam - and this is how I do it - overlap on each edge about just under 1/4". Pin. Draw a diagonal line where I have the ruler lined up. Can you see that? It is lined up on the 45 degree mark going up and down and diagonally it lines up with the little inside corners that are made by extending the fabric out a little bit. And - I love that little ruler for marking bindings, which is a good thing because it took me the longest time to find a practical use for it!


If you flip your binding and fold on the pen line (not where the pins are, but on the line you marked - and yes, I use a ball point pen to mark dark fabric - gasp!) - it should line up like the photo above. I always double check to make sure it lines up. If it doesn't line up, finger press a fold where it does line up and remark with a new, darker line! Sew on the line, trim the seam to 1/4" and press the seam open. There - perfectly aligned binding with diagonal seams!


Thursday, April 27, 2006

1 Weird Thing


OK - so you guys are all sharing 6 weird things about yourselves. And, I have thought and thought and can really only think of maybe 1 thing that might qualify as weird - so for what it's worth... here goes!

Driving: My parents had to force me to get a driver's license when I was 18. They even bought me a bribe truck - a brand new Chevy S10 - in order to tempt me to drive. The only problem was - there was something majorly wrong with the truck - like it would slip out of gear. So, I would be sitting at the red light, it would go green, I would step on the gas - and go ... ummm... backwards (that is just one example)!!! Oh yes, it was giving my poor Mom absolute heart attacks sitting over on the passenger side, stomping her imaginary brake and going "aaahhh, aaahhh, aaahhh", which in turn just put my nerves on edge! I don't think driving lessons were the highlight of our relationship, to say the least!!! In anycase, that truck and I just weren't a good match. Finally, Dad brought the truck to the shop - and the mechanic was - should we say - a bit patronizing? I mean, afterall, we are talking about a brand new truck and a teen-ager trying to learn how to drive - who is at fault? Nonetheless, they agreed to put it up overhead and take a look - and after determining that there was nothing wrong with the thing, they lowered her down and she promptly took off, across the shop, knocking over all the toolboxes and colliding with the back wall. Hummm, very interesting! Dad took the truck to another dealership and traded it in for a full sized truck and that was the end of me having a truck. The only good thing that I could see that came out of it, there was no more talk of me getting a drivers license for another year!

But eventually I had to learn how to drive. And with a driver's license came a series of very interesting cars. I used to have a Mustang in San Francisco and you absolutely had to STAND on the clutch to get it to go in - really fun while parking on those steep hill, let me tell you. If you tried loosening the clutch cable - the clutch would fall off - oops! Oh yes, that car was a real beast - at any stoplight you had to be standing on the clutch, and then the other foot had to be pushing in the brake WHILE also keeping pressure on the gas at the same time or else it would stall out on you. Not a fun car in traffic! Well, come to think of it - not a fun car for me at all!

I moved back east and for awhile drove a series of what I call "disposable cars". I even had one that my poor mechanic finally just decided not to work on anymore - he even offered to help me find a new used car! Eventually, I went through all my disposable cars and bought a used Mercury Cougar - and talked one of my sister's into going to look at it with me - she did the test drive! Nope, I did not drive this car before I bought it!!! I was too chicken to drive such a nice car that didn't belong to me - I mean, what if I crashed or something?

Skip forward to last spring - I was on the Cape and DH wanted me to bring a tractor up to Canada for him. Um, hello! We had a tiny little, beat-up, pick-up truck, then add a tow trailer, a tractor - is that little truck really going to make it up over the hills of Maine? I don't think so! But DH dearly wants that tractor, plus some attachments - like brush hog, post hole digger, rotar tiller... My brother had told me that the tractor was 4' across. I had been wanting a bigger truck - a truck with a front facing back seat for Little Boy's car seat instead of those side jumper seats. So, kill 2 birds with 1 stone, right? My bright idea was to get a new truck big enough to fit the tractor in to, so off I went to a truck dealership with a tape measure and started measuring truck beds. Came home with a new/used truck and was feeling pretty plucky! Except then my brother had to explain to me that, yes, although the truck bed was 4' across and so was the tractor - the tractor still had side pieces, etc. that came out further than 4', so no, it wouldn't fit in the back of the truck - I would need a trailer. Deep breath. OK, no problem. I got a truck with a factory installed tow package so a little landscaping trailer was my new plan. But then my Dad told me that it was easier to backup/tow a big trailer than a smaller trailer. He explained that 2 wheeled trailers swivel - much better to get something with more wheels - they are just all around much easier. Ah, ok - makes sense to me. Dad has been towing trailers for years so he must know what he is talking about, right? So, went off with Little Boy (not yet 2 years old) in my new truck to get a 16' car transporter. No doubt about it - 16' can't possibly qualify as a little trailer - I just knew Dad would approve! And more good news - I mentioned to the very nice sales lady that I had never towed a trailer before, that the plan involved a 2 day solo drive to Canada with a tractor (and a baby) and could she give me any pointers? You know - sometimes it helps to ask for help in life, because, boy was that lady ever a BIG help. She taught me everything I know about driving a trailer, how to hook it up safely, umm - the fact that with such a big trailer it would be a good idea to get an auxillary braking system, and all kinds of good stuff! And when I drove it into Dad's yard and he had me back it into the most impossible place in the entire world - I was right on. Dad was crowing with glee that I was a born natural. And soon after having the truck equipped with an auxillary braking system, Little Boy and I were off on our adventure. Sort-ov! One of my sister's was there when I pulled out and she definately didn't think my load was tied down correctly - so she called her DH to chase me down to double check everything. Well, brother-in-law prompty grounded me for another night while he rushed off to buy more heavy-duty tie downs and proceeded to make sure everything was ship shape and safe for the journey! Thank goodness, because now when I think about it... phew!

And brings us up to... BIG BOY. Yup - that is my RV in that photo. My DH drove it the first 2 years. I don't think I even ever sat in the driver's seat! Except now DH has a different agenda and so if I want to use that RV, well it is up to me to get it from Point A to Point B. And lucky me, my girlfriend from FL came up north for vacation last summer and taught me how to drive it - I mean, at this point, I could drive a truck with a trailer, so why not an RV? And I've been driving it solo with Little Boy ever since! Towing the car (my BMW which I love, love, love after some of those other cars I suffered through). And drive Big Boy I have - along the New Brunswick coast, on ferries (yikes!) and down to the Cape (that 2 day drive trip). In and out of different campgrounds and different parking spots and so far I've done pretty well. OK, so I took a wrong turn once and ended up on a dead end street - and no, you can NOT back up with the car behind you because that is a really weird tow dolly that swivels one way and the car goes the other. It is IMPOSSBLE to back up more than - say 2 feet. So that means the entire car has to be unhooked, etc. But, that was really the only jam I got into - otherwise, I've done fine (with my Little Co-Pilot!).

And, if that isn't a really weird thing - going from being forced to get a driver's license, being too chicken to do my own test driving for a Mercury Cougar, to buying a truck and trailer to tow a tractor, to driving that RV because I want to use it - well, I don't know what is weird. And, oh yeah - forgot to mention that DH drives a Chrysler Pacifica which I absolutely REFUSE to drive because I think it is too big!!

Big? Well, Big Boy is 37 feet long, plus the tow car. He has all the creature comforts of home on board - including a washer/dryer. AND, Little Boy and I absolutely LOVE him - he is like a part of the family.

So, if you think you can't do something - I am here to tell you that if you want to do it badly enough - you CAN do it. Just remember - ask for help along the way if you need it!
Posted by Picasa

Wednesday, April 26, 2006

Just Blue


Inspired by Jeanne's monochromatic 3" scrappy square quilts over on Spiral, I set about cutting a bunch of 3" squares - all in blue. Anything remotely blue made it into the cutting pile including some teals and whites with blue prints. Mostly Joanne's calicos, but I came across a ziplock baggie of 6" charms I had traded and some of those prints are really eye-popping, so it is an interesting mix - at least 50 different fabrics, but I didn't actually count. Definately a mix that Nancy would like!

While I was cutting these squares I also cut a bunch of 2" strips for an all-blue log cabin and then put the strings and crumbs aside for another project. And yes, Mary, I was thinking of you as I cut out all that blue! It took me awhile to cut all the fabrics - now I can get to the fun part - chain piecing. Oh, lookie - I already got started on that part. There are already over 20 blocks pieced which is always a fun point in the game because then you can start playing around with lay-out options.

First up is the diagonal set - I think this is my favorite - using a solid light blue for the zig zags - simply because I want to machine quilt it myself and I think that feathers would look great zig zagging down that space. I like this type of setting - it is old-fashioned and simple, but a little different - yet, you never ever see a pattern for it (hint, hint - Judy!) And yeah, I am a "real expert" on quilting feathers ever since I did a placemat (a placemat, mind you!) with feathers. Actually, it is a great machine quilting pattern - you just do a wavy stitch down and then half hearts going back up and then half hearts going back down and the heart shapes are more long-ish and most importantly - don't have to match! So anyway, now that I have a placemat under my belt, I am contemplating a big quilt with lots of feathers - on a sewing machine - ummm, am I just a little bit nuts? The other mind-boggling quilting option here is to hand quilt it - gasp! I really like Finn's utility style of hand quilting, enough to actually try it out myself. So, that is my other thought - still using the diagonal setting to quilt feathers or maybe even free-hand baptist fans.

Oh - and that photo of Little Boy crawling around - he is just a tad bit frantic because he just discovered I used a piece of HIS fabric - blue with little apples on it. Fortunately, very fortunately, I had 4 3" squares of this fabric and used only 3 of them. Phew! So - he still has his little piece for his fabric stash - oh no, is he going to be a fabric hoarder?

The second option is a little bit like putting the cart before the horse. I am always thinking that my borders could use a bit of jazzing up, and then I got to thinking that these blocks would make a cool border. Oh, except for the small fact that I would be missing the entire inside of those borders at this point. Hummm - can we all say - back into a clear tote for "some day"? So, maybe that isn't really such a good option at all, but it was fun to lay it all out and take a photo for my thoughts file. It is an interesting approach though - to make a border first and then go from there.

Well, that is what I've been working on - nothing on my Top 25 list - I think all those take too much thought and I just can't think this week - so a simple, mindless bit of chain sewing fit the bill perfectly! Or, actually, I do need to think this week - and when I strip cut and chain-piece it gives me lots of time to think of other things. Guess it all depends upon which side of the coin you are looking -whether this is a thinking exercise or not! And, at the same time I was thinking of Jeanne, Mary, Nancy, Judy and Finn - a true internet friendship quilt!

On another note - the hat pattern my sister and I made was Simplicity 5581.

And me, weird? I know you all are sharing your top 6 weird things and I have thought and thought and thought and can really only come up with 1 thing which I think might be a bit weird (which has to do with driving) - everything else is more like a personality trait! Anyway, I will think on it some more and let you know what I come up with, but I am warning you - it might be just that 1 thing.

Sunday, April 23, 2006

Happy Birthday Shakespeare!


Since today is Shakespeare's birthday, I thought it fitting to show the 2 Shakespeare in the Park quilts I've made... This is a Judy Martin design - I got my directions out of the Jan/Feb 2001 Quilter's Newsletter Magazine, but I know it is also in one of her books, but I just don't know which one! The finished quilt is 76.5" X 93.5".

The first one I made was the blue one - I wish I had a better photo, but this will have to do for now. It is very scrappy with almost every single piece of fabric within each block different. The quilt was so easy to make and went together so nicely, I made another one - purple the second time around, still scrappy, but not as scrappy as the blue one. I am not sure the scrappiness shows on the close-up - the whites are all different whites/white-on-whites so it is subtle.

And how do you keep a zillion pieces organized? Zip lock baggies - clearly labeled with a Sharpie pen. See...


I've seen some other very lovely Shakespeare's on other blogs in different colors. It has gotten me to thinking about another Shakespeare... maybe reds and yellows?

Friday, April 21, 2006

Sewing Sweet Baby Quilts!


These 2 little quilts are about 37" X 49". I pieced the blocks last year using odds and ends of leftover 2" strips (lights) from making log cabin quilts. Today I added the 2" inner borders and 6" outer borders. Aren't they sweet? I intentially made them narrow on the top so the borders and backing aren't pieced. I think they are a perfect size for a washable baby quilt!

My plan is to back them in a soft flannel and quilt them myself on my sewing machine - not sure when I will get to that seeing that I don't have any flannel or batting, but at least they are ready to go once I do.

Thanks for all the kind comments about my quilting attempts on Little Boy's I Spy quilt. I really did have fun doing it - and if any of you haven't tried free-motion quilting yet - you should try it! Start with something small - like a placemat - and go from there.

And the hat pattern - I used my sister's but will ask her for the pattern information and will post it for all who want to know!


 Posted by Picasa

Thursday, April 20, 2006

Sewing Hats


My sister and I made these hats together yesterday. We had so much fun sewing together and were laughing at our different sewing styles - she does not follow the directions - does it in her own order, while I practically have to have a pencil to check off each step as I go along. She is much better at sewing clothes than I am, but I still like to watch her progress and boss her around each step of the way and then ask her - how did you do that? How far did you trim that? Where does this go? Her hat brim was done before mine and she thought it was a bit small - so I used a smaller seam and got a bit bigger of a brim on Little Boy's. Let me tell you, a 5/8" seam allowance seems huge after using 1/4" for quilting for so long! Her version is very clever - the inside is rain material which matches "mud" pants she made for her son to wear last week - to go over his regular pants when he plays outside. In anycase, we have 2 happy little boys with the finished project and we had a good visit over our sewing machines.

Actually, she came to visit for a few days and even though the weather was not exactly the best, we still had fun. We managed to take the boys out for some walks - because, oh yes, exercise is good for 2 active boys (her son is 6). We also did some sight-seeing by car and it was during these drives that Little Boy discovered the joys of picking an arguement! This was typical:

Cousin: I see a dog.
Little Boy: No you don't, I see a dog.
Cousin: I do too see a dog.
Little Boy: No you don't. I see a dog. You don't see a dog. I see a dog.
Cousin: No, I see it.
Little Boy: It's MY dog.
Cousin: It's not your dog.
Little Boy: Yes it is my dog. It is my dog.

On and on. Little Boy usually thinking it all very funny (or getting upset) and Cousin getting more and more insistent! It was driving both my sister and I a bit crazy until we decided that it was funny and started to laugh about it instead. But honestly, the 2 boys did have a wonderful time playing together which was nice to see.

DH was a little surprised when my sister unloaded her car and hauled in a sewing machine. He thought I was the only crazy person who traveled with a sewing machine in the trunk of the car - silly man! Much to DH's amusement we took over 2 tables and stayed up at night chatting and sewing away. We worked on some other stuff too, but the hats were our "joint" project.

Wednesday, April 19, 2006

Sweet Pinwheel Quilt


I sewed these blocks up last summer and left the top at this stage... the time for borders stage. Well, I have auditioned several fabrics for a plain border, thought about piecing a border, thought about a skinny border with a wide border... and have come to the conclusion that maybe this top doesn't need borders. Sometimes simple is better. Many antique quilts don't have borders and I think that if I bind this top with the that bright blue solid it will give it a nice frame. Right now it measures 61.5" square, which is a good size for one of my many nieces, so I think I will stop here. I just might have to piece a backing of scrappy blue and pink squares though... we will see.


And I wanted to say thank you for all the applique help with my dresden sunflowers. Some of you have posted your own sunflower projects and it has been fun to see the different varieties! I have decided to hand sew them down on the dark green, but I am going to machine sew the center circles onto the flowers because I like the decorative stitch that I used on my sample. That flower is supposed to go on a 6.5" square, but I cut my square 7" so a little more of the background shows. It might not be until the end of the summer before you see another photo, but I will be picking away at it as I have time!

Monday, April 17, 2006

Child's I Spy Quilt


Done, done, done! All quilted (by me!), bound and labeled. I used 6" novelty charms and the finished top is 51" X 61". Oh, and did I just say that I quilted it? Yes, you heard right. Every once in a great while I will actually quilt a top myself (although I do prefer sending them out). I think we tend to be our own worst critics, because even though I might not think it is the best quilting in the world - it is truly loved by one Little Boy, and at the end of the day - since the quilt is his, that is all that matters, right?

Take a look... I just did these free-hand while stitching...


My Little Darling!


Umbrella


Butterfly


Well, you get the idea. Every block has a different picture - I did a house, a tree with a flower, stars, crescent moon with a profile face, a swirling sun, apple, spelled out his name going diagonally - 1 letter per block, etc. etc. I hope you didn't laugh too loudly - I know, I know, I should try to draw these things out first and then they might look a little better, but that doesn't work for me - just doing it while at the machine is easier for me! With pen and paper I strive too much for perfect. If the sewing machine needle is humming along at a nice steady speed, I just go and go - and loop around and around to make a picture. The trick for me is to keep the speed always the same - if I slow down to think, I'm doomed - if I go to fast, well it is too fast. And before I know it - I have a block done, maybe not perfect, but done!

Finishing this quilt took awhile - and was a bit of a challenge for several reasons...

First, I ran out of red thread. And since I started the quilting with red thread, I wanted to finish it with red thread. So, it sat for a bit (a long bit) until I was able to actually 1) go to a store that sells thread and 2) remember to buy red thread because I usually only buy off white and gray for piecing!

Second, I lost the rest of that dark blue which I wanted to use for the binding. Or, maybe I used every little bit of that fabric already and just don't remember that part? I auditioned a few other fabrics for the binding and then finally decided - forget about the contrast - just use the light blue planets, even if it is a large-ish print and get the thing done!

And Third - I had basted the edges just to hold it all together, which was a good idea because Little Boy likes to play with this quilt on the floor. So, when I actually got back to work on it - he was very upset that it was full of pins and he couldn't play with it. Which meant - I only could work on it while he was sleeping! Needless to say - I machine stitched that binding on - not going to play tug-a-war while I am trying to hand sew the binding onto the back!

So, it is done - and that is a good thing, because the truth of the matter is - it has taken me so long to finish, and Little Boy has played on it sooo much, that it needs to be washed!!!

Think I will go back to dreaming about that long arm machine again...

Saturday, April 15, 2006

Flower Block


OK, someone posted asking if anyone knew the pattern source for this block - or at least a block similar to this one. Right away I thought it was a Quiltmaker pattern - I could just visual the magazine layout in my mind. So, I looked through a few back issues -and presto, I found it right off! I have looked and looked through all the blogs trying to find that post and can't find it again - so I decided it would be faster just to make a block and post it on my blog and hope that it is seen by whoever was looking!

So - here is a block from the quilt called Bed of Roses - first published in Quiltmaker in March/April 1996 (issue 48) and re-printed in Quiltmaker's All-Time Favorites Spring of 2000 (photo of cover below). The original quilt is featured in 30's(?) pastels. I made my block in Christmas-sy fabrics - just in case I ever get around to making a Christmas quilt!

I thought this block might be a bit tricky, thinking that the center yellow part was a set-in seam. Not so! You just make a partial seam and then sew in segments counter-clock wise. When you get to the last seam it joins into the first partial seam - with a straight line. No set-in seam at all, got to love that! All the triangles are flip-and-sew. I made the mistake of eye-balling the triangles on the flower petals (can we say a bit wobbly?). By the time I got to the leaves I found my little mechanical pencil and drew diagonal lines as a guide - so much better! I might make a few more - next time around I will draw a line for all the triangles for a more accurate seam. Still, for a first try, I think the block came out pretty good.

Oh yeah - one more thing... it doesn't seem that seam allowance size really matter on this block! I just just just switched sewing machines and forgot that the 1/4" foot on my current machine really isn't 1/4". So, the block that is supposed to measure 11 1/4" (not sure if that is finished or unfinished size, but that is what the magazine gives for a size) - well, mine currently measures a perfect 12" - so that would be 11 1/2" finished. A bit off in any case, but at least all my points still match pretty good - even on the top, except I chopped it off a bit on the photo.

Anyway, I hope that helps! If you are making blocks for a charity quilt I would be happy to make up a few more to contribute - it didn't take very long at all - just let me know what colors you need and if this size is OK.


Friday, April 14, 2006

Dresden Sunflowers - in progress


This is a little project that I have been working oft and on (more like oft than on) over the past few years. They are super easy to make - you sew the tips together before piecing the segments so you have no raw edges on the outside - see...


In anycase, I am up to 20 of them so far - thought I would blog about them today since I just showed you some of the yellows I bought to make some more, plus I bought a dark green background to applique them onto. AND, you all are blogging about project spectrum in orange, so maybe this might count - yellow and orange? They are laid out on a piece of black fabric for contrast.


So, this is the part where I need some applique help! I put 1 of them onto a 7.5 background square and machine zig-zagged it on just as a test. I don't like it! Since it is already turned under I think the way to go is to hand applique it down. Or, maybe a machine blind stitch instead? Or, black blanket stitch??? So, do I baste it on? Stablize it with something else? Use yellow or dark green thread??? No idea!!! But, I know some of you are really great at applique so thought I would ask. The centers of each flower are going to be plaid - I sewed the circle onto paper first so there would be no raw edge and then used a gold thread and subtle decorative stitch on my machine for that part (I like how that came out, but it is hard to see in this photo).


Just ignore the (wrinkled) background on the above photo - it isn't what I will use. I am all out of petals to sew together, so sometime this week I hope to cut some more out - if they are all cut and by my sewing machine I can do a few here and there and it will add up. Still no idea how I will end up setting them, but probably on the diagonal. This is one UFO that is just too sweet not to finish!


Thursday, April 13, 2006

Shopping Fix


So, what did I buy my first trip to Joanne's after being away from fabric stores for months and months??? Well, some things on my list - rotary cutter, scissors, pins, ruler, cutting mat, seam ripper, fabric pen, sewing machine needles - just not up to lugging these things back and forth across the pond so duplicates were in order! I know, I know - 2 magazines - Yikes! But, that cover quilt was just calling out to me and the Quiltmaker one has a Puffin wallhanging that I just have to make! And the price seems like such a bargain after paying about 12 Euros all winter for a quilt magazine. The skirts magazine was just a few bucks, but has great coupons on the back and I was able to use one for 50% off the cutting mat! Yeah! And the fat quarters? Yellow to add to my Little Dresden Sunflowers (on my Top 25 List) and blue fat quarters - not on my Top 25 list, but on a 2nd list and these were just the perfect colors, so what is a quilter to do when you find the perfect colored fabric? Plus, those fat quarters were on sale for $1 each! Not bad at all for the first time out!

Quilt shop #1 - 1 yard of novelty for Little Boy.

Quilt shop #2 - border fabrics for my Broken Dishes and Geometric Squares. I must say - the fabric seemed very expensive and I had to check my receipt 2X just to make sure it really was that much money. They weren't too friendly to me there either even though I just popped in and out very quickly and Little Boy was a perfect angel - right away I got him a fat quarter with trucks on it and that kept him happy while I got my border fabrics cut. I don't know - I just got the immediate feeling that we weren't that welcome there so I am not sure we will go back there again.

So - back to Joanne's for a 2nd trip - got to love Joanne's because they are smart enough to have shopping carts with a safety strap for your toddler - so I got thread, hand sewing needles, a little tape measure that was just too cute, rotary cutting blades (50% off!), stabelizer, marking pencil, elastic, fabric to make DH pants, 2 novelties for Little Boy, 3 fat quarters, background fabric for my String Tulips, background fabric for Little Dresden Sunflowers and setting fabric for my 16 patch. And that is it!!! I think I did Grrreeeaaat! - having a list in hand definately helped to keep me on track. There were other things on that list too, but I couldn't find "the perfect match" so skipped it for my next trip - what I have now is more than enough to keep me busy for awhile! Oh, and I've got to add - I just love having a nice, new, sharp rotary blade. Goes through fabric like cutting butter!
 Posted by Picasa

Wednesday, April 12, 2006

Autumn Colors Scrap Quilt


Whirly Gig #1 is ready to go to the long arm quilter!

Remember that Top 25 list I posted awhile back? Well, this was one of the UFO's I had listed - actually, I'm making 2 of these quilts. I just started playing with the pattern one day with different colors and after making a bunch of blocks I realized that I had 2 different color schemes going - one fall and one tropical. So, I finished up the fall colored blocks and now have 9 lonely tropical blocks that need some friends. In anycase, this one is done! I am dreaming about some feathered quilting in all that yellow space... I always just have a panto done on my tops, but I think that all that open space calls for something more special! But, ummm - yeah, those BIG bias edges did stretch a wee bit - might have had something to do with this next photo, do you think?


Yup, my offical quilt jumper strikes again. I took this photo after I removed the riding car he was trying to ride over the quilt top on. Boys will be boys! Actually, it is just a slight little ripple - not bad at all - the 1st photo is of the quilt draped over a fence so of course it looks wavy. This photo is at my Dad's house - he has the very best kitchen floor for pinning quilts! Of course, I always think the kitchen is too wide when I am walking back and forth cooking, but it is perfect for laying quilts out on.


Here is a close-up of the beautiful yellow, green, and orange marbled fabrics and that border fabric, plus a block.  Opps! Below the Amazon links...scroll down!  I bought enough of the border fabric to cut it all in one piece along the length - maybe I should have mitred the corners, but I like it the way it is. Hey, done is done! Now, I wonder what I will do with the rest of that fabric? Hummm, maybe I can think far enough ahead to fall purses or placemats or something.


And last, but certainly not least - the pattern source... Traditional Quiltworks, Issue No. 60 (Display until March 8, 1999). The pattern says the quilt is 74X 94 1/2", but mine is a bit bigger because I used 2 borders. My outside borders I almost always cut at 6.5" - because that is the width of my ruler - good reason, huh? Anyway, I really love this pattern! You strip piece 3 fabrics together and then cut them out in a sort-ov chopped triangle shape. Piece the units together and - surprise - open up to see what you fabric choices look like (12" block)! Keeps it interesting and fun for me. It all went together absolutely perfectly too - something I always rejoice about!!! One down, but I must confess, I have found some forgotten UFO's since I've been poking around my sewing room a bit, so my list isn't shrinking.

If you buy something from Amazon, I would really appreciate it if you would use my links. Thank you so much!


Monday, April 10, 2006

Safe Travels


Hello there! We have had safe and happy travels! Here is a snapshot of Little Boy ready to go (thank goodness for luggage carts!). That's all my luggage - little green bag is mostly bedding for Little Boy - I always keep that consistent no matter where we go so he has a good nights sleep! Sometimes I think it is a bit of a bother to lug around - I mean, it takes up an entire suitcase, but he is always sooo happy to see his own pillow, knit blanket, quilt, sleep sack, etc. - it is worth it! This time around I left the sheepskin in Austria and will buy him a new one for this side of the pond - he has slept on a sheepskin since he was born! Big bag (which is actually one of our smaller suitcases) - our STUFF. Duffle bag? That is almost empty! It is actually our carry on (because it is empty I can squish it down into that ridiculous size-checker for carry on luggage - after taking our jackets out). Oh, let's see... potty seat, pull ups, favorite blanket, complete change of clothes, 2 books, snacks - the normal carry on stuff for any Momma of a toddler! Yeah, I pack a potty seat - not sure where I would find another padded Elmo potty seat and you never know with a toddler - that could be a huge problem! At the last minute I left the computer and camera with DH- you have to open both up through every single security check and I thought I would have my hands full enough with a very active toddler without bothering to take photos with the camera to prove it is a digital. I did have my little camera in my suitcase though, so still managed to take some photos of some of our doings, but not as many as I usually would. It doesn't seem like much stuff, but once you have to carry it all around - ugh.

We have had fun!!! Little Boy is such a wonderful traveler - planes, buses, cars, time zone differences, visiting a ton of people, hotel rooms, different houses - he takes it all in stride. And now, happily, we have just arrived to our final destination today and this tired Momma is thankful to be home!!! I will write more later, but wanted to at least check in!
 Posted by Picasa