
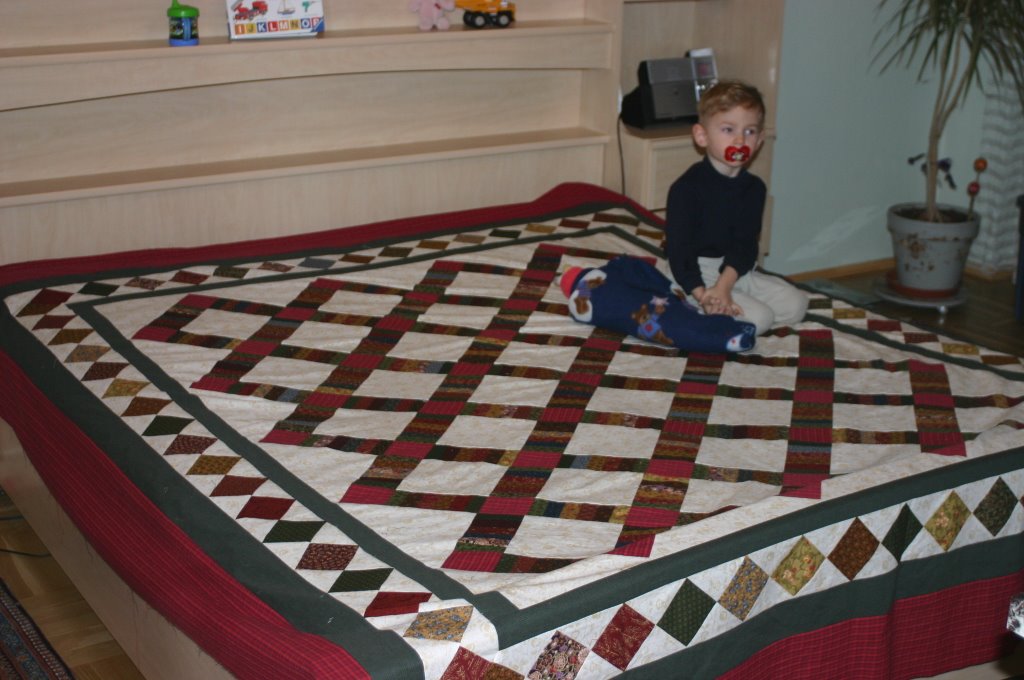
Maybe I should just call this "My Big Hairy Quilt". It is big - the directions say 88X101", but I haven't measured my version, so that would be an approximate measurement. And, it is hairy, I have spent a fair amount of time clipping threads - of course - it probably didn't help that I used that red/orang-y plaid that tends to ravel a bit! Next time around I think I will spray starch the heck out of the fabric before cutting! And, it does lie flat - my bed rail is rounded at the end - and this is a European bed which is low to the floor, so I have it reversed. In Canada I have a very high bed and the ends will drape over it just fine!

The pattern is Crossed Tracks from the book Save the Scraps by Gayle Bong. I paid $24.95 for this book from Big Horn Quilts. The pattern is also known as Railroad Crossing and I like to call it my Bars Quilt. And, even though I have seen this quilt pattern many times before (finn is working on a lovely version - take a look-see over on her blog at www.finnleah.blogspot.com - click on February archives and scroll down to Feb. 15th), I was particulary drawn to the borders on this version. So off to work I went...
First, the cutting instructions have a handy-dandy chart to refer to, which includes all the pieces, including the borders, EXCEPT for the 66 3.5" scrappy squares you need for the border, which is listed in the Materials list for the quilt. So, happily cutting away at night, after the baby is in bed, every fabric that had... say 4-6" left, I cut into strips for my stash bin. Fortunately, I sew in bits and pieces because later I realized the need for the 3.5" squares and actually had enough fabrics left to cut the border squares. So, maybe the border isn't as scrappy as I would have liked, but at least I didn't have to piece fabric together to get those 3.5" squares! I wrote - in pen - in my book on that chart PLUS 66 3.5" squares for the scrappy medium/dark scraps.
OK, all cut out now! The body of the quilt itself went super fast! Staggering the strips and then cutting them was a new technique to me, so off I went, staggering 10" as clearly illustrated in the drawing. The directions say about 10". Never mind, I sometimes sew at night after the baby is in bed, and I admit - I might be a wee-bit tired at this point in the day, so I do rely on directions and I was looking at the illustration, not reading text buried in a paragraph! So 10" it was, not "about" 10". Until I got to the part that those same 10" needed to be cut into 3 segments, each 3.5". Ummm, 3.5" X 3 equals 10.5", not 10". So, right away I had a problem! And lucky me, at this point I didn't have too much sewn together, so all was not a complete loss, although I now have a fair amount of pieced 3" sections that are left over ~ (I have a limited amount of fabric on hand, and being in Austria - no, I can't just run out to the fabric store to get some more!). I ended up sewing all my long strips together 2 at a time, subcutting them into 3.5" units and then sewing 3 units together to get the 6 needed fabrics, per segment. It accomplished a scrappy effect! Plus, I don't know about you, but when I sew 6 1.5" strips together, they tend to wave - unless I am super careful about sewing 1 strip one way and the 2nd strip the other way. So, 2 plus 2 plus 2 to make the 6 worked just fine for me without the wave.
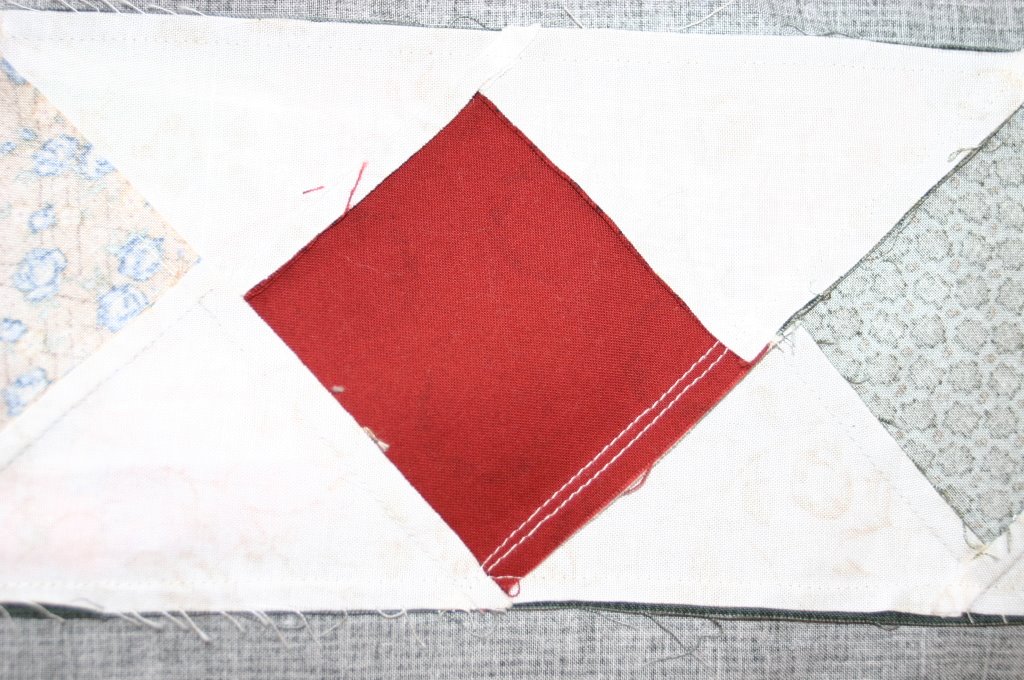
All in all, I am liking the way it is looking. I am really super pleased with my choice of colors and the tan on cream background print and the red/orange plaid. And, excited as I was, I got a good start with the borders too. But, ran into a problem, feeling that the setting triangles were a tad too small - and not wanting to chop my points OR have a tiny seam allowance, I set to work with the seam ripper. Scroll down to a previous post to read about this - and thanks for all the offers to help me rip - it did give me the gumption to keep at it! A fellow Stashbuster sent me the formula for setting triangles and I double checked over at Bonnie's site, AND sent an e-mail to Gayle Bong, author of the book. Turns out, those setting triangles should have been cut at 5.5" squares and sliced 2X diagonally instead of the 5.25" squares the book says. So, my intuition was correct in questioning it! I think that Gayle might have even had enough time to let the publisher know the error since the book is just about ready for republishing! Yeah, I took my pen, crossed out 5.25 and wrote in the correct 5.5" in my book. Am I the only one who writes all over my books?
OK, fine, I thankfully have enough of my background fabric to cut more triangles! I am out of the colorful scrappy squares fabric though so I have to resort to the seam ripper to salvage those. And, off I go, piecing those borders. But at this point in time, I think my seam allowance might be slightly off because I had a different foot on the machine, or maybe I was overcompensating due to the previous error, or whatever... because - when finished - those border strips are a few inches longer than the quilt top. Hummm. And at this point I am absolutely kicking myself because before I even started this quilt I made a mental note to lay it all out on the floor before cutting the first border, so I could make any necessary changes to make it fit the pieced border. But, did I write this in my book at the beginning? No! So, I add a skinny strip of red. And it doesn't set off the pieced border nearly as well as my green and DH thinks it looks like a mistake - I agree, and again, use the seam ripper.
My solution is to take a slightly larger seam just about every other square to ease it all in. This way - the corner squares won't look "chopped" at the corners. And that almost works! With a little coaxing! Can't put the baggy on the bottom in this case for fear of chopping the points, so I am watching the slightly larger border race ahead of the sewing machine needle. And, I always cut my borders LONG instead of piecing strips together - so they tend to be a bit less stretchy when it comes to easing. What is one to do? Well - don't look at this if you sew on a fancy-dancy computerized machine because I wouldn't want you to fry the thing... but, what I did was grab a spray bottle of water and absolutely soak that top border and bottom fabric into submission. Yup - when the fabric is wet you can mush it down with your fingers just fine and still pull the bottom one a wee bit and it will iron out without any puckers. I wonder how those new machines with even feeds would like this system? Anyway, it is one of my last resorts, but sometimes you have to do what you have to do!
I also tried following the mitering directions (which are about the same as everyone elses), but for the life of me, I never can get a smooth miter with these directions! I tried! And then I rip that apart too and sew it my usual way - 1 seam right to the end of the fabric, the 2nd seam right up to the stitching of the 1st seam. I don't leave the recommended 1/4" before the ends - it just doesn't work for me. Then I fold the top fabric at the mitre angle and right where I need to sew it - and press. That is my sewing line. After sewing, and repressing open, if the stitching line isn't exactly on the final pressed fold - I just go back and restitch on the fold. Perfect mitres every time - nice and flat! Yes, I almost flunked home-ec sewing for not following directions! Maybe I am a teacher's worst nightmare, but I accomplish what I want in the end!
So, now I have that finiky pieced border on - and the 2nd border water sprayed into submission. Only that final red border left to go! And those are the pictures you saw the other day with Little Boy helping me. And, don't worry about my back - I usually only pin borders when he is napping - he just helped me on that one and I was 1/2 way down that side before he climbed on my back! And he really is my Lucky Charm because guess what? Those final red borders didn't need any easing at all! Amazing!!!
I am pleased with this quilt. You might have noticed that 2 more versions are on my Top 25 list - one in blues/yellows and another in mauves/sage greens. I have my notes now! I have the correct measurements! I know how to do the 2nd and 3rd versions. So, yes, despite some troubles, I am very pleased with this quilt top and am looking forward to making it again! Oh, and did I mention - it is BIG!
4 comments:
It is big & lovely - How are you thinking of quilting it? (Anything fancy in the cream squares?) That border is GREAT. BTW I hand applique my miters - the only way they "turn out" for me.
Mine version is still in strips in the zipper baggie....
I like your version of this quilt - great colors.
No you aren't the only one to write in your books - I write all kinds of notes in mine. Corrections definitely should be made.
you really persevered with this! and I always write corrections in my books too. It always surprises me how many errors creep into published patterns. I think it turned out great-too bad you had to do so much ripping and yet, you did salvage that fabric so well-a great example of having to use exactly what you had to work with-and making it come out your way.
WOW! I think you probably are entitled to some of the books royalities!! That's alot to leave out of the directions...or to "bury" in a paragraph. I hate it when authors do that...almost like an afterthought. So glad you, being such a bright quilter, worked it out. I think I might have been hopelessly muddle by then!
Great job Evelyn, and it does look wonderful....huge, but very neat and dramatically striking!!
Yes, I also write in my books!!
Post a Comment